Tire Pressure Monitoring System (TPMS) Repair Tips
Standard® and Intermotor® are committed to helping technicians with TPMS repairs, whether it’s offering OE-Match TPMS sensors or providing repair tips from our team of ASE-certified master technicians, like these TPMS repair tips:
1. Know the Difference Between a Solid and Flashing TPMS Light
First, it’s important to know the difference between a solid and flashing TPMS light. A solid light means there’s a tire that’s under- or over-inflated or one with damage. To correct, the tire needs to be inspected, but generally adding air will solve the problem. A flashing TPMS lamp indicates a fault with the TPMS system, such as a malfunctioning sensor or module. In this case, more diagnostic work is required.
2. Test, Not Guess
Next, before dispatching a vehicle to a technician to install new tires, be sure to confirm that the TPMS system is functioning properly. To do that, it’s critical to test, not guess. With a TPMS tool in hand and the vehicle in TPMS Learn Mode, work your way around the vehicle reading each sensor for accurate pressure, temperature, sensor ID and battery life to make sure all of the sensors are working properly. This simple step can go a long way toward making sure your customers are satisfied with their repairs.
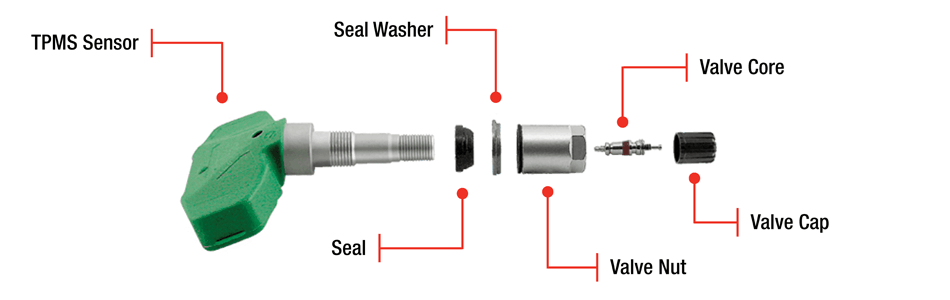
3. Don’t Forget the Service Kit
Lastly, the Tire Industry Association (TIA), Rubber Manufacturer’s Association (RMA) and the Motorist Assurance Program (MAP) require that every time a tire is removed from the wheel you should replace TPMS service parts such as the valve stems, seals, washers, nuts, valve cores and caps. Intermotor® offers a full array of service kits to complement your TPMS repairs.